Pliers 101 — What You Need to Know
 What do you need to know about pliers for chain maille? It isn’t too complicated, but read on to make sure you get the right kind for working with the jump rings. Because as they say “size matters”, LOL. 😉
Seriously, there are different shapes and sizes of pliers, and not all are appropriate for making chain maille jewelry patterns.
Pliers 101 – The Shapes
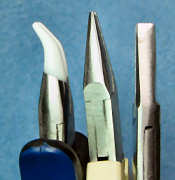
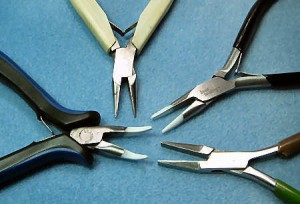
As you can see from the photo, there are different shapes to pliers. The kinds used most for jewelry are flat nosed, chain nosed and bent nose.
(You can see the differences better in the next photo, below.)

Left to right – bent nose, chain nose and flat nose pliers.
The “nose” is shape of the jaw. The one thing necessary for any kind of nose is that the jaws are smooth. If the jaws are a tiny bit rough they can be smoothed with a very fine-grade sandpaper (think auto detailing). But you do not want anything that is more than a little rough, or anything with ridges.
Another kind that you don’t want to use for chain maille (but which is useful for other jewelry applications) is the round nose plier. They don’t offer enough of a grip on the metal rings and you’ll slip and slide.
Plier Jaw Sizes and Use
Chain maille jewelry patterns are most often made with 16, 18 and 20 gauge jump rings. These thicknesses of metal generally doesn’t require heavy-duty pliers. The exception would be using stainless steel or titanium rings in anything larger (thicker) than 20 gauge.
If you’re working a lot with 20 gauge rings, you’ll definitely want some fine chain nose pliers. By this I mean that the jaws are very narrow and come to a fine point. The chain nose plier (middle) in the small photo above is a Lindstrom and has an exceedingly fine tip.
If you tend to work more with the 16 and 18 gauge rings, you might want to go with a pair of flat nose pliers, as they offer more of a grip surface.
Bent nose pliers are useful for wiggling into a tight place. You can also use the bent “elbow” like you would a flat nose plier, as the elbow offers a larger gripping surface.
In any case, you need two pairs (minimum), so you might want to get different kinds and see what you like best. Me, I prefer the bent and chain nose (and yes, I use the “elbow”) for working, but everyone is different. Try a few and use what’s easiest for you!
A Little or a Lot – Price
How much should you spend for your pliers? Good question! You can find them for under $10 and more than $75. And everywhere in between.
My suggestion is to start out with a few inexpensive pairs in different shapes and sizes, to see what fits your hands and working style. Then, when you want to upgrade, you know what you want before you make a $75 mistake!
I have my Lindstrom set (pretty darn expensive), but so well-made that it’s lasted years already, and I expect it to last many more. I have some Eurotool and some other various manufacturers. Some are less than $10, some around $15. In other words, I have a bunch! And interestingly while my Lindstrom is my favorite, my second-favorite was only $9. Go figure!
So you don’t need to spend a lot of money, unless those are the pliers you like best.
To Coat or Not to Coat
It wasn’t until I started working with colored jump rings that I started using rubber coatings on my pliers. Now I don’t mean pliers with rubber jaws (totally useless for chain maille), but rather regular pliers that have a rubberized coating applied.
I use a brand of tool dip called Tool Magic. There are other brands, so use what you like best (and what is easiest for you to find). I dip the tips of the pliers so that they have a thin coating, and then let them dry. Then I re-dip and let them dry again. Which is another reason I have like 5 or 6 pairs of pliers — I have some drying and some ready and waiting while I am working with yet another set.
In any case, the rubberized coating helps to prevent slippage and also helps prevent scratching the rings. Notice that I said “helps to prevent” and not “prevents” because you can still be too rough if you’re not paying close enough attention.
The choice is yours. Some folks don’t like the coatings, others can’t live without it. I say try it and see, as it’s only around $10 for a jar.
Chain Maille Pliers 101 — Summary
So you’ve learned the types of jaws that are good for maille work, and what you need to watch out for.
Size is dependent on the gauge of rings you choose to use, as well as the metals you plan to work with.
You’ve also learned that price is not the be-all (inexpensive does not necessarily mean cheaply-made), and that trying out several inexpensive pairs will give you an idea of the handle shape and jaw shape you like best.
And then there is what you choose to do as far as coatings are concerned. There isn’t a right or wrong– just what is right for the way you work.
So there you go; I hope you’ve found this helpful!
Chain Maille 101
 Welcome to chain maille 101! It’s for learning about this cool art form, which is both ancient and new. Ancient because chain maille (also spelled chain mail and chainmaille) has been used as armor for centuries. New because it’s being used now for amazing jewelry (among other things).
Intro to Maille
If you’ve heard the term but aren’t quite sure what it is, maille is linking rings so that they form a repeating pattern, known as a weave.
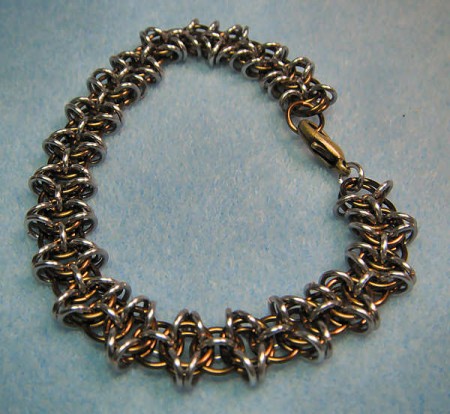
The photo to the right is a pattern called “Celtic Visions” and it’s one of about a zillion weaves out there. OK, I’m exaggerating a little, but there are hundreds, if not thousands, of different ways of joining these rings.
Jump Rings
I keep talking about rings, but what kind? They are known as jump rings, and most of the time are made with metal. The metal rings are cut so that they can be opened and closed. The rubber or neoprene rings are all in one piece.
Without rings, there is no maille. Metals used run the gamut — steel, iron, aluminum, gold and more. When it comes to jewelry, the most common metals are silver (argentium, sterling or silver-filled), gold-filled, niobium, titanium, aluminum, copper and enameled copper. Stainless steel is sometimes used, and bronze has its fans as well. As you can tell, there are lots of options and lots of price points, too.
 If you’re on a budget, try aluminum. Money to burn? Go for gold-filled for a stunning piece of jewelry.
Tools of the Trade
So what kinds of tools do you need to make chain maille jewelry? Not many!
Two sets of pliers are necessary — one for each hand. While it’s not necessary to buy top-of-the-line, you do want some that have a smooth jaw and are comfortable to hold and use.
Aside from the usual (good lighting, comfortable workspace, magnification or at least protective eyewear), what else? A small straight piece of wire (for opening a path in a tight spot) and some twist-ties are about it. Isn’t it nice to take up a hobby that doesn’t have many tools?
Oh, I’ll talk about it more when I go more in-depth with the kinds of pliers, but you might want to use something like Tool Magic to put a light rubberized coating on the tips of the pliers.
What Else for Chain Maille?
A sense of adventure! You’ll start out learning specific ways of linking the rings so they form patterns. But once you have a good grasp of the basics, you may find yourself exploring. Sometimes it will be a mistake that turns out to be a cool new pattern. Other times you might stare at some rings and think to yourself, “I wonder what would happen if I…”. 🙂
So definitely learn some of the basic weaves first, then move on to the more complex ones. And before you know it, you’ll be finding different ways to connect the rings.
That’s it for now. I’ll be back a little later with more info about rings and pliers — what you need to know before you buy!